Thursday 19 July 2012

Rainbow envelopes and cards!

I found these lovely items below on Etsy shop Rainy Day Colors, aren't they great?! But they look pretty simple to make too. If you think they would be great for your wedding, I suggest you give it a try!

You can either use a edge punch or lace border punch to achieve the effect on your chosen paper. Another option is to buy different colour doilies and play around with them. You don't need to necessarily follow the rainbow scheme. If you're planning on using them for wedding invitations, you can mix white with your theme colour, for example. 

I am just a big fan of simple and extremely cute ideas!

Rainbow envelopes and cards!
Lace Rainbow is handmade by Rainy Day Colors

Rainbow envelopes and cards!
Spring Butterfly credit goes to Rainy Day Colors

Friday 13 July 2012

Framed petals

Framed petals
Photo Credit: Taken by me, with Instagram!
A quick post to share a quick idea... 

Every time I get given flowers, it breaks my heart when it is time to throw them away. Sometimes I keep the petals inside of old books to find them only years later, but most of the time I can't remember the occasion or who gave me them...

So recently I thought with myself - Why not display them using a photo frame? I kept some of the leaves as well and made this in literally two minutes! I also wrote on the back the date and the occasion... A perfect record for sweet memories! And you can fill an entire wall with them if you want.

This one is helping to make my living room a little prettier, like the fresh flowers did once. 


"Wow look at you now
Flowers in the window
It's such a lovely day
And I'm glad you feel the same"


Wednesday 11 July 2012

Teddy Bear made of a good old sock!

I am a big fan of Friends, so it was great when I came across this amazing - and visual - tutorial of how to create a teddy bear out of a sock! For those who didn't follow, Phoebe's character in Friends makes "sock bunnies", but they're not even close to being as cute as the one below.

I confess I don't know who owns the credit for this tutorial. I found it originally on Pinterest, but I've been searching the web since to try to credit the original creator and found at least three different websites that claim ownership. So I want to make clear for anyone reading this: I didn't have the idea, I didn't make this teddy or take these pictures. My only credit, if any, was to put together the montage.

I am only reproducing it here because, as I said, I saw it on Pinterest and I absolutely love it!

Teddy Bear made of a good old sock!
* I am not sure who to credit the pictures to, these websites have claimed
ownership: forum.taobao.com, junkaria.com and themetapicture.com

Saturday 7 July 2012

Afghan Pattern #2 - Little Diamond Square

As promised, here is the second pattern of the afghan I am working on. This is meant to be a beginners pattern, but it is a tiny little bit more complex than the previous one.

>> How to: Pattern #1 - 8  Points Star
>> Crochet for beginners

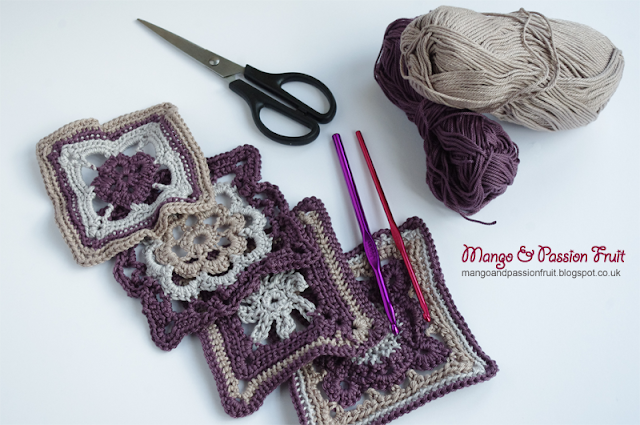
We're working the one on top of the picture. This is a pattern you start from the middle and work anti-clockwise.
Afghan Pattern 2 - Little Diamond Square
Credit Photo: Zaira Brilhante, with Pentax K-x


Pattern: Little Diamond Square (#2)

Foundation: Work 4ch and join with ss to form a ring.
Round 1: 6ch (equivalent to 1tr, 3ch), then [3tr into ring, 3cg] three times, 2tr into ring, join with ss into 3rd of 6ch.
Round 2: Ss into 3ch space, 3ch (equivalent to 1tr), [2tr, 2ch, 3tr] into same space, 1tr into each of next 3tr. Then repeat sequence [3tr, 2ch, 3tr] into next 3ch space and 1tr into each of next 3tr three times. Join with ss into 3rd of 3ch. Break off yarn.

Round 3: Join next yarn to a 2ch space. Work 6ch, miss 4tr, 1dtr into next tr, 6ch, ss into next 2ch space and repeat sequence (6ch, miss 4tr, 1dtr into next tr, 6ch) three times. Join with ss into first ch.
Round 4: Start with 1ch. // 7dc into 6ch space, [1htr, 2ch, 1htr] into next dtr to make the a corner, 7dc into next 6ch space, 1dc into 2ch space of Round 2. Repeat from // three times and join with ss into first dc.

Round 5: 2ch (equivalent to 1htr), 1htr into each 6dc, 1tr into next htr, // [2tr, 2ch, 2tr] into 2ch corner space, 1tr into next htr and 1tr into each of next 7dc, 1tr into next dc, 1htr into each of next 7dc. Repeat from // twice. Finish round with [2tr, 2ch, 2tr] into 2ch corner space, 1tr into next htr and 1tr into each of next 7dc, 1tr into next dc. Join with ss into 2nd of 2ch. Break off yarn.

Afghan Pattern 2 - Little Diamond Square
Come back soon for the next 2 patterns!


Round 6: Choose a side of the square to start working from and join next yarn into centre tr. 3ch (equivalent to 1tr) // 1tr into each of next 7htr, 1htr into each of next 3tr, [2htr, 2ch, 2htr] into 2ch corner space, 1htr into each of next 3tr, 1tr into next tr. Repeat from // three times and join with ss into 3rd of 3ch. Break off yarn.

Round 7: Join next yarn to any stitch. Start with 1ch, 1dc into same place and then work 1dc into each tr or htr of previous Round. Remember to work 3dc into each 2ch corner space. Join with ss into 1st dc.

Round 8: 1ch, 1dc into same place, 1dc into each dc of previous Round working 3dc into centre dc of each 3dc corner. Join with ss into 1st dc. Fasten off yarn.

Friday 6 July 2012

Re-use vintage book covers!

Remember my previous post from 29th June about how to print pictures on old book pages? As I said, I love it when I come across a very nice old book with a vintage cover. I know that for a lot of people it is a sacrilege to damage a book - I used to feel the same way - but when the reason for it is to make something pretty, I sort of excuse myself.

Well, if the pages can be used to print pictures and make cards, why not use the cover for some DIY action as well?

Re-use vintage book covers!
Photo Credit: www.anamublog.com

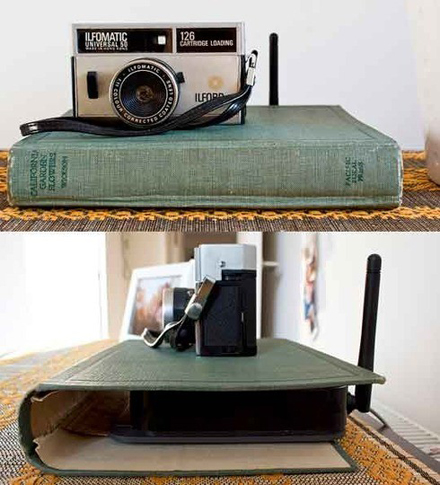
Anamu explains on her blog how to re-style your router in a simple and very visual tutorial. You can use the premise for many other purposes, be creative! I am thinking of making one to keep/hide the mail, as I don't like to see it on top of the chest in the corridor.

Re-use vintage book covers!
Photo Credit: http://cosmocricket.typepad.com

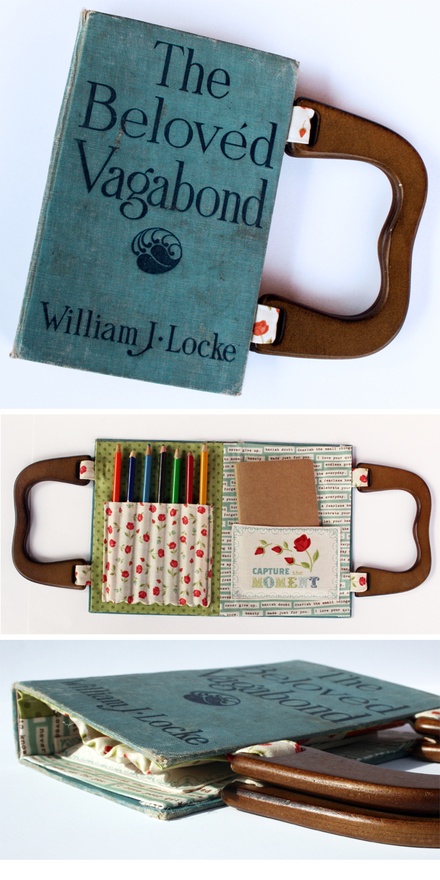
Another great tutorial can be found on Cosmo Cricket, although this one is slightly more complex to work and requires a lot of skill. I guess I need more practice before I can adventure on this one, not to mention a sewing machine! But I guess kids would love it...

Thursday 5 July 2012

Creative ways to use pebbles

Olly finds me potentially crazy when I do it, but every time we go to a different beach I browse for interesting pebbles to collect (sometimes forgetting the luggage weight restrictions...).

I used lots of them as decoration on our wedding and at home, but these two websites have so far made the best use of it I've seen by simply painting them. I just love it, you should check out both Geninne & Caroline's art!


Creative ways to use pebbles
Photo Credit: Geninne Art's Blog 

I love how she uses the rocks as paper weights or just as decoration. I find all the elements in this picture particularly amazing!
Very sweet and gracious...  Blogdelanine.blogspot.co.uk 

Creative ways to use pebbles
Credit Photo: The Caroline Johansson

I am a big owl fan. I don't know when it started, but I guess I inherited it from my granny.
I can't wait to put my drawing skills to a test and make cute little ones like these two, by Caroline Johansson.  Thecarolinejohansson.com