Friday 29 June 2012

Printing on old books

As I get older I spend less and less time on Facebook and a lot more time on Pinterest, searching for decoration ideas for the house, nice recipes and tips on crochet. I came across a very nice post the other day, by pinner Lisa Gill. It had a very pretty image with the following caption: "Print photos on old book pages".

I couldn't believe my luck! Only recently I had spent a good half an hour browsing charity shops for interesting old books. And by interesting I mean vintage covers, different fonts or the yellowest pages I could find! I managed to get two very good ones I have been using for scrap-booking.

Printing on old books
Photo Credit: Zaira Brilhante, with Pentax K-x


So I thought I should give it a go and try the printing technique. As I could not find a tutorial for it (there where no links on the pin), I decided to write my own to help those that are not that familiarised with Photoshop.  

How to:

1. First thing you will need to do is desaturate your image. If you prefer to use a sepia effect you can, but I wouldn't do it as the colours might go a bit funny depending on how yellow your old book page is.

2. Next step is to crop around it. I used the Polygonal Lasso Tool for it and step by step removed the background of my picture. First I did a very rough cut and then I zoomed in enough and started to go around it more carefully using cmd + x to delete my selection completely.

Printing on old books
Zoom in to make it easier to use the Lasso

3. With your image cropped and your background fully removed, it's time to play around with the brightness and contrast to get the watermark effect. I first reduced the contrast and then balanced it with the brightness to sharpen it a bit.


Note: Remember that whites will be hard to show, so you need to make them a shade greyer than you would want a normal photo to be. I hope the picture above gives you a good idea of what I mean. In this particular case, the bride was way too white, so I isolated her again using the Polygonal Lasso Tool and changed the contrast only on her. 

4. Once you're happy with your image, I advise you to save it as a png and open it on Word. It's just simpler to align it this way. Don't put your book page straight into your printer tray, use tape and stick it to an A4. Don't tape it on the very edge but about 2cm below, to make sure the printer won't damage it.

You can use these prints on portraits, for scrap-booking, to make nice cards and invitations for weddings, anniversaries and so many other things. It's simple and great.

Thursday 28 June 2012

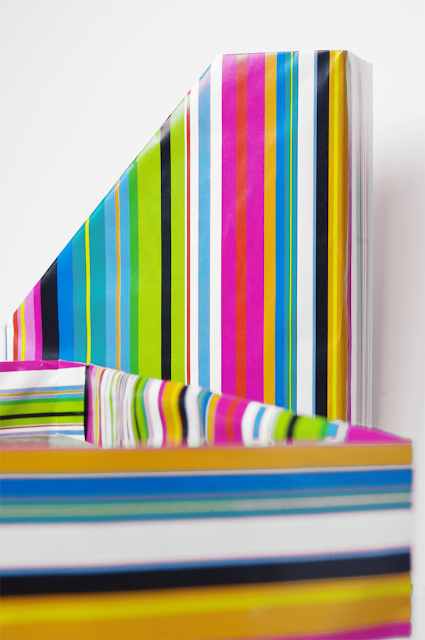
Stationary out of cereal boxes!

Fact # 1
I eat a lot of cereal. I know, a lot of people do, but cereal for me is not a breakfast thing. I can have cereal anytime, day or night. I remember a period during my early 20s that I went on a funny diet of light chocolate milk and cereal for lunch!

Fact # 2
My office space at home is not that big, so I try to keep it as tidy as I can. Cute stationary holders, however, tend to be very pricy. I wasn't keen on spending that much, so I had to come up with a cheap but efficient solution. That was when I figured out this formula:

Cereal Boxes + Nice Wrapping Paper + Mod Podge = DIY Magazines & CDs organisers


Stationary out of cereal boxes!
Photo Credit: Zaira Brilhante, with Pentax K-x

How to:
There is no mystery really, you just need to be careful not to use too much mod podge/glue. I also find that thicker paper (150g/mor over) is better to work with, but that really depends on you.

1 - Cut the cereal box in the shape you want it to be, place over your paper (wrong side) and, with a pencil, trace around it. You will notice that on the top, I spared some paper that I folded inwards, to give it a nice finish. For that, with the assistance of a ruler, leave a 2.5cm gap and trace a new line, parallel to your top border marking. For the sides, I left about 1cm on one end only and for the bottom I left about 5cm, but it really depends on the size of each box, so make sure you leave enough paper to fold and fix it like you would do wrapping a present.


Stationary out of cereal boxes!
Photo Credit: Zaira Brilhante, with Pentax K-x


2 - If you are working with kids, I suggest you draw dashed lines marking all the corners and places you will need to fold your paper, just so they don't get confused. Make 2.5cm cuts on the 4 top corners (until the box border marking). This will help to avoid air bubbles when folding the top paper inwards and it will give your work a more polished finish.

3 - Choose a corner to start from. If you measured it correctly, don't start using the very edge of the paper, but leave the side 1cm flap to be folded later on. Using a brush, spread mod podge or a good craft PVA clear glue over one side of the box and fix the paper. Move around until you covered all the sides. Choose if you want the 1cm flap to go over or under. It really depends on the pattern you're working with.  

4 - Fold and fix the bottom, the same way you would do if wrapping a gift. Apply mod podge to the tips of the paper on top and fold them inwards. Work one side at a time. If the interior of the box is damaged or if you want to reinforce it, use brown paper inside. It looks great!

Stationary out of cereal boxes!
Photo Credit: Zaira Brilhante, with Pentax K-x

Monday 25 June 2012

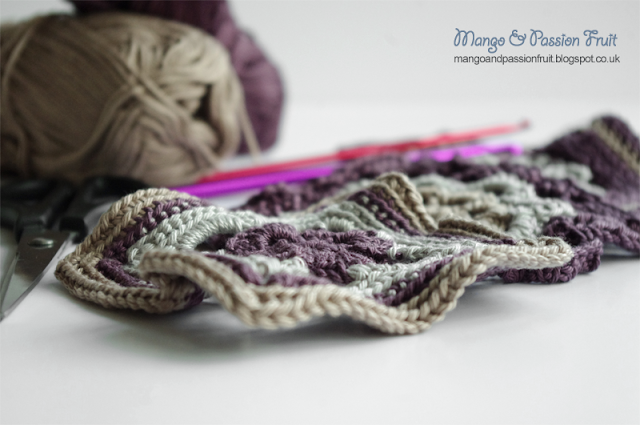
Afghan Pattern #1 - 8 Points Star

Four months ago I shared here that I decided to take an adventure in the art of crocheting. I went from someone that didn't even know what yarn or needle to buy to someone with sore fingers due to a - not always successful - attempt to keep the same tension throughout hundreds of stitches.

To read the first post, a sort of "crochet for dummies", click here. 


Afghan Pattern 1 - 8 Points Star
Photo Credit: Zaira Brilhante, with Pentax K-x


I finally managed to work 4 of my favourite patterns to make my throw and I decided to share them here. They should all be easy to follow, as they are beginner level patterns, but feel free to ask any questions.

Before, however, I should say I am using 4.5mm needle aiming to make 15cm square blocks. I used Wendy Supreme 100% cotton DK.

Note: During my first attempts crocheting I tried to make these patterns with wool, but I didn't like the effect as much as with cotton yarns. Cotton not only emphasises the pattern but is also much easier to handle and I am not even using a particularly that good or expensive brand.

Afghan Pattern 1 - 8 Points Star
Soon more patterns!

Pattern: 8 Points Star (#1)

Foundation: Work 4ch and join with ss to form a ring.
Round 1: 1ch, 8dc into ring, join with ss into 1st dc.
Round 2: 6ch, 1dc into 3rd ch from hook and in next ch, then 1htr into next 2 ch and ss into next dc. You completed the first point. Now repeat this round 7x and at the end of 8th point, join with ss into 1st of 6ch. Break off yarn.

Note: We are starting this pattern from the middle, making the star. From the next round onwards, we will work on the reverse side of the pattern and will stitch anti-clockwise. I used three different colours, but you can play around as you prefer. 

Round 3: Join your new yarn to the tip of any point. Start with 5ch (equivalent to 1tr, 2ch), 1tr into same place and you completed a corner. Next 4 ch, ss into tip of next point, 4ch. // Now [1tr, 2ch, 1tr] into tip of next point, 4ch, ss into tip of next point.  Repeat from // 2x and join with ss into 3rd of 5ch.
Round 4: Ss into next 2ch corner space. // 3ch (equivalent to 1tr), [2tr, 2ch, 3tr] into same space, 4tr into each of next 2 4ch spaces. Repeat from // 3x replacing the 3ch for 1tr. Join with ss into 3rd of 3ch.
Round 5: 3ch (equivalent to 1tr), 1tr into every tr of previous round working [3tr, 2ch, 3tr] into each 2ch corner space. Join with ss into 3rd of 3ch. Break off yarn.

Round 6: Join next yarn. Repeat steps of previous round. Break off yarn.

Round 7: Joint next yarn. 3ch (equivalent to 1tr), 1tr into every tr of previous round working 5tr into each 2ch corner space. Join with ss into 3rd of 3ch. Fasten off yarn.

Sunday 24 June 2012

Nutella Cookies

I can't emphasise enough what a big fan of Pinterest I am! I know I could easily spend all day browsing cute and creative pins from around the world... Recently, I came across a recipe originally from Tastykitchen.com.

The best Nutella cookie recipe
Photo Credit: Zaira Brilhante, with Pentax K-x

However, I tried a different approach and followed the advice of pinner Paula Wetzel that suggested we should drop the sugar... Well, the result was a super tasty and light cookie, easy to make with the kids and fun to shape as well, even when you don't have moulds!

You will need

Ingredients:
200g of Nutella (a full small cup)
200g of all purpose flour
1 x whole egg

Kitchenware:
A large bowl
Non sticky grease proof paper 
Baking tray

Preparing time: 15 minutes

How to:
Mix all the ingredients in a large bowl until you get an almost even pastry. Make little balls (1 spoon full) and flatten the pastry using the palm of your hand or a glass to assist you. I found it very easy to make heart and star-shaped forms out of it. 

Pre-heat the oven to 180°C. Cover the tray with the grease proof paper, place your cookies and put in the oven to bake for about 10 minutes or a little longer if you like them crunchier. 

Note: Don't forget to leave at least 1cm between the cookies. Wait until they cool down to serve. This recipe will make 10 large cookies.

Friday 22 June 2012

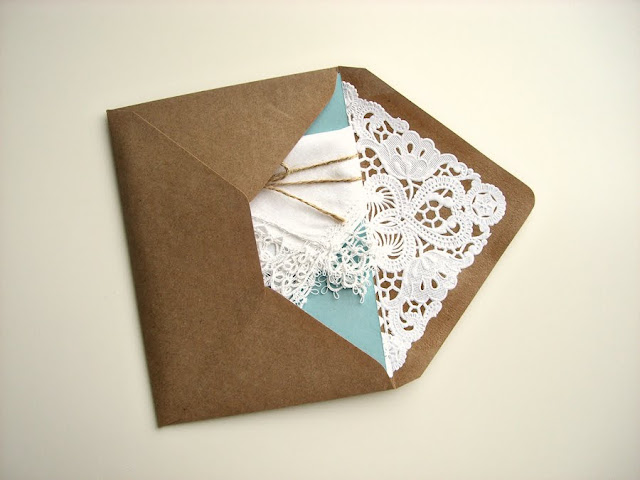
More ideas of cute doily-laced envelopes

I recently I had a comment on my previous blog Too Many Likes regarding the post Cute Vintage Doily Envelope.

Budget Barbie said...
So lovely and pretty, inspired me to come up with something doily related without having to spend so much. Still keeping the romantic & rustic look!!

This was a nice surprise as I came across her blog My Big Day On A Dime, with lovely and cute ideas for brides to be! (and anyone that like me loves DIY projects)

Following on from the same idea of my previous post, the two pictures below give you an idea of how to use simple paper doilies to make personalised vintage look envelopes.

More ideas of cute doily-laced envelopes
Visit www.heaskedisaidyes.blogspot.co.uk for the tutorial

More ideas of cute doily-laced envelopes
These ones are for sale at Etsy.com but why not to try make them instead?


Turn an old top into a new bag!

I recently went through my wardrobe and did what my husband called a spring clean. When we recently moved home, I had got rid of a lot of things, but there is always that pair of jeans you hope someday will fit you again or that shirt that can almost tell the story of your life, you liked it so much and wore it so many times, that it seems almost like a sin to simply discard them now... 

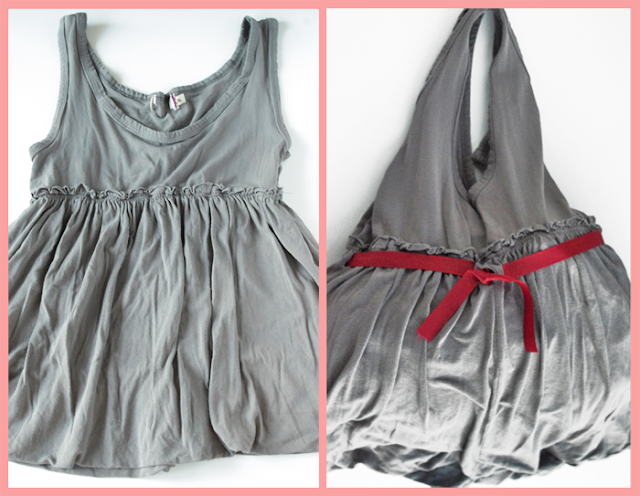
Turn an old top into a new bag!
Photo Credit: www.craftynest.com

Well, this time I had enough and decided to get rid of everything. Start fresh. I had already put together the suitcase to take to the charity shop when I came across the picture above on Pinterest and I simply knew what to do next...

I recovered one of my favourite tops of all time that I had grew out of and following some of the steps suggested on Craftnest made my own tote bag!

Turn an old top into a new bag!
I am not sure the picture does justice to it, but trust me, it looks great! I should have ironed it first though...

As I don't have a sewing machine yet, I had to work a super reinforced hand stitch in the bottom. I also had to fold inwards both side corners to give it the rounded shape I wanted, but apart from that, it was a pretty simple process, very straight forward really.

I added the ribbon as a final touch. As my top was double layered, I cut 1' holes on the sides, back and two on the front, just below the bra liner elastic and inserted the ribbon through it as you would do with a belt. It helps to fasten the bag as well as adding a bit of colour to it.

I advise everyone to try! Check www.craftynest.com for the complete tutorial.

Friday 15 June 2012

Dark Chocolate and Coconut Bonbons

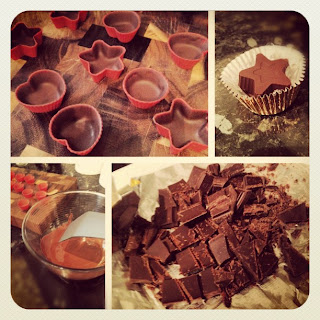
Not many people know, but valentines day in Brazil is not celebrated in February, like in the rest of the world, but on June 12th. Not a coincidence, Olly and I chose this date to get married last year.


Dark Chocolate and Coconut Bonbons
Taken with Instagram
Dark Chocolate and Coconut Bonbons
Taken with Instagram
       
Last year, I planned to make these for our wedding, but we changed our minds last minute. Last Sunday, however, I thought I had to try again. It worked out great! So I decided to share some tips on how to make it here:

You will need

Ingredients:
400g chocolate bar
I made them with dark chocolate, but you can use milk or white chocolate as well
A can of condensed milk
150g of desiccated coconut granules
Butter or olive spread

Kitchenware:
Silicon chocolate moulds (about 40)
I got mine from Amazon for £3.99 a pack with 24
1 x large and 1 x small pan
A glass bowl
A couple of trays to go in the fridge
A wooden spoon, a normal spoon, a tea spoon and a knife
toothpicks

Preparing time:
Because tempering chocolate is a slow process and requires a lot of patience, I would say 3-4 hours to make about 40 bonbons.

How to:
I like to start preparing my work surface as well as my ingredients. I had 40 moulds so I decided to make batches of 10 at a time.

1) Prepare the coconut filling. This is what we call "beijinho" in Brazil, you can read more about it here ("Little Coconut Kiss"). In a small pan add the condensed milk, a spoon of butter or spread and about 150g of coconut. Use a wooden spoon to stir it on a low to medium hob. You can add more or less coconut depending on how dense you would like the filling to be. When it stops sticking to the sides of the pan you should take it out and reserve on a buttered plate.
Note: You can use different fillings, if you don't like coconut, for example, Nutella works really well!

2) Separate half of your chocolate and cut it into small pieces. By small I mean, break the chocolate in the usual squares and cut these into half with the help of a knife. It's good to do it over the actual chocolate wrapping so not to waste any bits. Now we need to melt and temper the chocolate.

3) Fill a large pan with water and place a glass bowl on the top of it. Make sure the bowl is large enough that it won't "sink" in the pan. Also be careful not to over fill the pan with water. Test it before placing both on the hob. Place half of your cut chocolate into the bowl. The hot water underneath will make the chocolate melt in 10 to 15 minutes. While the chocolate is melting, prepare your mould. Place them on a tray and leave it next to you. Separate a tea spoon and the toothpicks.

4) Once the chocolate in the bowl has fully melted, turn off the hob. Carefully, so not to burn yourself with the vapour, remove the glass bowl from the top of the pan. 
Note: Remember, chocolate and water don't go together, so make sure not to spill any. 

5) Tempering the chocolate is mainly to get it down to the right temperature for it to be worked. This is important otherwise your bonbons might never solidify as they should or might become all sweaty. If you have a kitchen thermometer, you can use it to check the temperature. Dark chocolate is good to be used when it reaches 30ºC to 32ºC. Milk and white chocolate, when they reach 29ºC or 30ºC. To bring the temperature of your melted chocolate down, use the remaining chocolate you cut into pieces before. Add it to the bowl, one full spoon at a time and stir it. The newly added chocolate will start to melt and this will bring the temperature of the whole thing down slowly. If you don't have a thermometer, a good way to check if you reached the right temperature is to stick a wooden toothpick in the chocolate and to bring it to your bottom lip. If the chocolate feels colder than your lip, it should be ready. 

6) With your chocolate tempered, use a teaspoon to help covering your first 10 moulds with a thin layer of chocolate. Make sure to cover it as evenly as you can but not to make the layer too thick. Place your first tray in the fridge for 10-15 minutes while you are doing the same thing with your second batch. Your first batch should be ready when it looks fully dried (slightly lighter colour, pretty much how it looked like before you melted it). Repeat the last step twice on each batch until you have covered every mould with three layers.

7) Once the third layer has finally dried, your coconut filling should be cool enough for you to use. So again, using a tea spoon to help you, add the filling remembering not to leave any lumps.

8) With the filling in place, it's time now to finish off by "closing" your bonbons. Use the tea spoon to seal the bonbons with another layer of chocolate. Don't worry about making it too thin now, the important thing is not to leave any gaps, so the bonbon doesn't break when you take it out of the mould. It's ok if your base goes a millimetre or two over your mould height. Once you're done, place your trays in the fridge again and you should be ready to get them out of the moulds in about 20 minutes time.

9) Now use the same bowl and repeat the process from step 3, using the other 200g of chocolate. The reason why I didn't tell you to use it all in one go is that it would make it harder for you to temper it and to keep your melted chocolate to the right temperature for it to be worked throughout the whole process.

I hope you like it!