Wednesday 31 October 2012

After salt bath, sugar body scrub

I received so many nice comments about the homemade sea salt bath post - Nothing better to chill out than a hot bath! - of last week, that I thought you might like this one too.

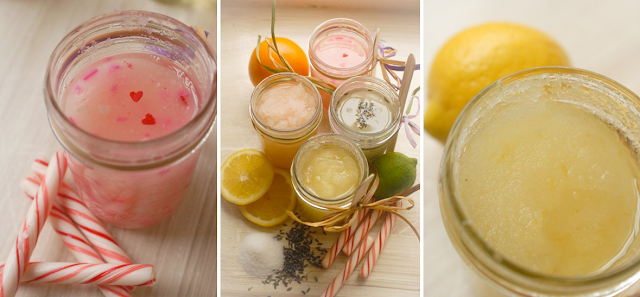
Homemade sugar body scrub
Photo Credit: My Sweet Garden

I simply can't fail this recipe by FactoryDirectCraft.com. Below is what you will need, plus some tips of what I think you should also try:

- Coconut Oil (like this I found in Amazon, pack of 6 x 250ml for £6.78)
- Ideally, raw cane sugar, but brown sugar should work as well.
- Again, a few drops of your favourite essential oil to give that little extra touch
- Jars and all sorts of ribbons, tags and twine to decorate as you wish!

The recipe is simple: 1 part oil to 2 parts sugar. Mix it until you get the right consistency and add 4-10 drops of your chosen essential oil. I would also try to add, instead of essential oils, a few drops of lime or orange juice, and see if I like the result. If you're planing to give them as gifts, you could also add fresh cut bits of lavender or grated lime/orange skin to add colour and texture and to make it look even more expensive and original!

The essential oil should do the trick and add the little bit of colour to your recipe, like in the picture above. But note that Jessica Christman advised us not to use food colouring, as she believes it can stain your skin and towels. Although, previously, the salt bath tutorial did say we could use up to 3 drops. So I guess if I wanted more colour than what I got just by adding the essential oil, I'd give it a go...

Different from most homemade treatments, this body scrub doesn't need to be used straight away and can be safely stored in a mason jar. It's a definitely a must try!


Tuesday 30 October 2012

Simple and pretty idea for trick or treats!

Tomorrow is the 31st of October... Halloween! I came across so many fun ideas this month on Pinterest, however, I was so resentful that I was going to be out working all day and night this Wednesday, that I chose not to save them or to think of halloween... At least until today.

I couldn't help it when I saw this picture... It's such a simple and pretty idea for trick or treats! I am definitely making it for next year, but if you're still looking for inspiration, here it goes.

It's time for trick or treats!
Photo Credit: PineFeather

The secret of this tutorial is to use file folders to make these "wallets" (like these by Ryman's or these by Amazon). The original, unfortunately, has a few issues. Some of the links to the materials are not working - although I managed to find the resources for 2 of them, as you'll see below - and I find that Heather, from PineFeather, spent maybe too long explaining how to cut the folder, in detriment of not showing us how to stitch the sides, or to stick the ribbon, etc...

I know for some people that might seem pretty straight forward, but I think that the beauty of tutorials is not to assume everyone knows what to do just by looking at a picture. Over a year ago, when I started browsing the web for crafty projects, I was so clueless and it was thanks to amazing tutorials that I learnt so much in such a little time.   

The broken links on the original tutorial:
- Boo to you stamps set by PapertreyInk
- Halloween tags by PapertreyInk

>> My 2 cents:

I am not used to work with stamps, so I'd probably try to achieve the same result with Photoshop and an inkjet printer. But be careful: if you choose to create a template and print it directly to a folder similar to the one used in the tutorial, make sure you choose one that is 90 to 270 g/m2 thick, as this is the range that most home inkjet printers can handle. If you're not sure, check the manual of your printer before taking any risks.

To achieve the rounded effect on the top corners, use a corner cutter. In this tutorial, Heather used a sewing machine, but I wouldn't be putt off by not having one. I would use a tapestry needle and a thicker threat or twine and hand stitch the sides, like I did on the Little notepads out of cereal boxes! post.

For the details, like the pumpkin and trick or treat tags, you can print them on different colour scrap paper and use a rounded cuter. It's not that you cannot do it with scissors, but it will take you so much time and in the end you won't achieve the same neat finish. I've learnt that different shaped paper cutters are a must have in every crafter's tool box!

I would use double sided tape to stick the tags in case I printed them in normal paper, as glue and/or mod podge might make it too wet. If you print it into card stock, then I think you're safe to use them. For the ribbon, I'd stitch them, to be on the safe side. Voilà, just place your candy sticks in the pocket and you're ready for when the kids knock at your door!


Monday 29 October 2012

Wallpaper beyond the walls

It's a funny thing, but just the sound of the word "wallpaper" makes my other half, Mr. Hunter, shiver. I think there is nothing he hates more than wallpaper when it comes to home decor. Poor him, when the time comes for us to decorate our home...

Anyway, I thought of starting a new section on M&P that sort of falls a bit under the Home & Crafts, but that is not necessarily made of tutorials, just ideas and inspiration... I couldn't think of a better name for it than 4Home, I know... I'm open for suggestions, but in the future you can look for more posts under the label Home Ideas.

And here is the first post! I recently collected some ideas of what you can do with wallpaper when you extend its use beyond the traditional "let's fill the entire wall" approach. I hope you like it, and if you have more ideas, I'd love to hear about them @craftyblog

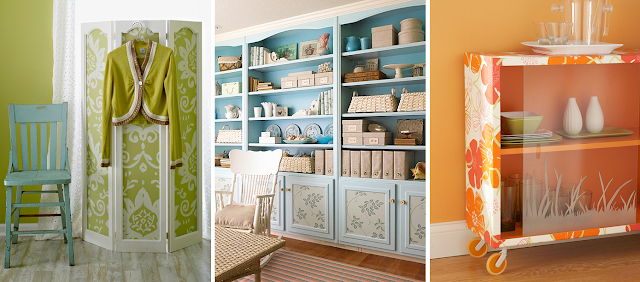
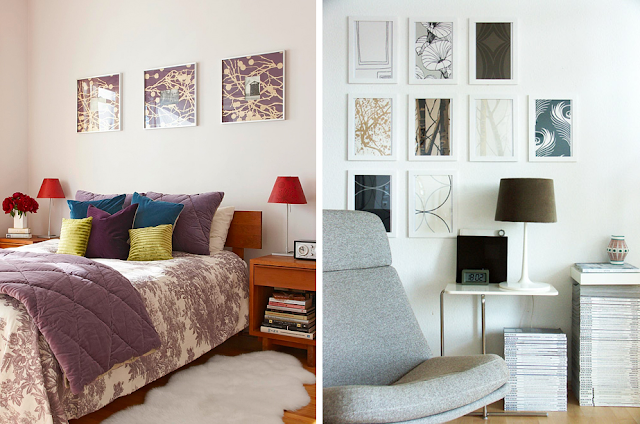
Ideas of what you can do with wallpaper when you extend its use beyond the traditional "let's fill the entire wall" approach
Use the wall's original features and add some texture to it!

Ideas of what you can do with wallpaper when you extend its use beyond the traditional "let's fill the entire wall" approach
Add patterns to those furniture items that could do with a make-over.

Ideas of what you can do with wallpaper when you extend its use beyond the traditional "let's fill the entire wall" approach
Have bits of it framed and make beautiful wall arrangements with the result.

Ideas of what you can do with wallpaper when you extend its use beyond the traditional "let's fill the entire wall" approach
Add a charming touch to draws and cupboards interiors.

A lot of these pictures came from a selection of ideas displayed at Better Home & Gardens or Apartment Therapy, others from a collection of posts on Pinterest and a couple of them I came across on google images when searching for inspiration.


Sunday 28 October 2012

Beautiful wedding jewellery

I am sorry for another "journal" kind of post, but I am sure although this is not a tutorial, it's something you will find as sweet and loveable as the cutest post on this blog!

Today I met a great crafty team, thanks to another #giveaway! The lovely people from Crafty Folk on Etsy@craftyfolkEtsy were promoting a draw, sponsored by the Etsy shop Polly-A Jewellery, which was offering one of its beautiful bracelets as a prize. Would you believe if I said that I actually won it?!?
It took me a few minutes to take it in once they told me via twitter. After spending the whole weekend working long hours in front of my computer looking at tons of different spreadsheets and trying to make sense out of complexes schedules (you can imagine, it was as fun as it sounds...), it seriously made my day!!!
{{ Look what a wonderful prize is on its way to my home sweet home! }}

Beautiful Etsy wedding jewellery
Pearl bracelet with silver heart charm - ideal wedding jewellery or bridesmaid gift. By Polly-A 

If you're as in love with it as I am, you might find that U$20 is so worth to pay for this bracelet and there are 6 more available on Etsy. I just wanted to say as well that I had a look at the other items at Polly-A and there are soooooo many wonderful things. I've added at least 3 of them to my wish-list! You should totally check it out!

Friday 26 October 2012

Nothing better to chill out than a hot bath!

When I first moved to the UK I was impressed and surprised to find that pretty much every house, flat, and even studios had a bath! Coming from a tropical country as Brazil, the concept of a hot bath was a mystery to me. Today, however, I can't think of a home without a bath!

The temperature this week dropped considerably and I was glad to find this tip on Everything Etsy that works not only as a cute gift, but also as a DIY must for the cold months. There is nothing better to relax the old bones and muscles tensed up by the weather than a sea salt bath.

Homemade bath salt
Photo Credit: Everything Etsy

You will need: Epsom salt, sea salt, your favourite essential oils and food colouring! Oh, and I forgot to mention, you can repurpose glass jars and decorate them with all sorts of ribbons, string, twine, tags, scrap paper... Just let your imagination play its part.

The idea is simple. Get 1 cup of each salt, 3 drops of food colouring and 5 to 10 drops of oil. Mix it all in a large bowl. For more pictures and a step-by-step visual tutorial, check Kim's post here

Thursday 25 October 2012

The return of Sharpie!

I wasn't sure what would be the best title for this post, if the one you can see above or Sharpie 2.0. Jokes aside, I've been really busy today updating my Etsy shop, so I haven't had the time to write a tutorial. However, I thought of featuring a reminder of one of the techniques I learnt this year which changed my life!!! It really did...

Remember the original post  Sharpie + Porcelain + Oven = personalised items ? Below is my latest attempt at playing with it and with the settings of my camera. I am debating with myself if I should keep it or put it up for sale on Etsy...

The return of Sharpie!
Photo by Zaira Brilhante, with Pentax K-x

By the way, I am running an #AUTUMNSALE on M&P @ETSY. All items in the sale section have a 25% automatic discount. No need for coupons of anything else. I'll soon add a couple more things to it too... You can have a glimpse below.

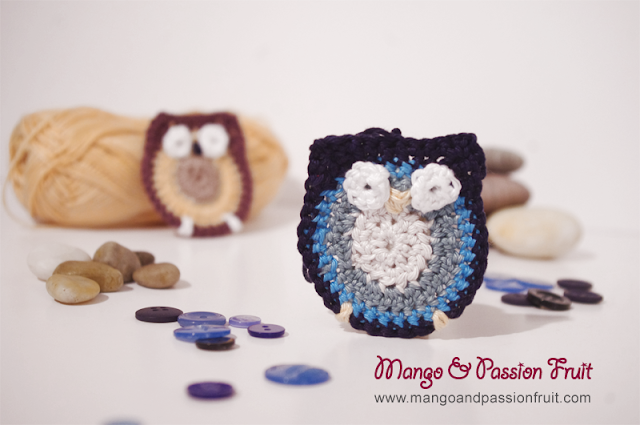
This lovely pair will make Christmas OWLsome!!!
This lovely pair will make Christmas OWLsome!!! Only £7.50 on ETSY

Wednesday 24 October 2012

Wall art with pinecones

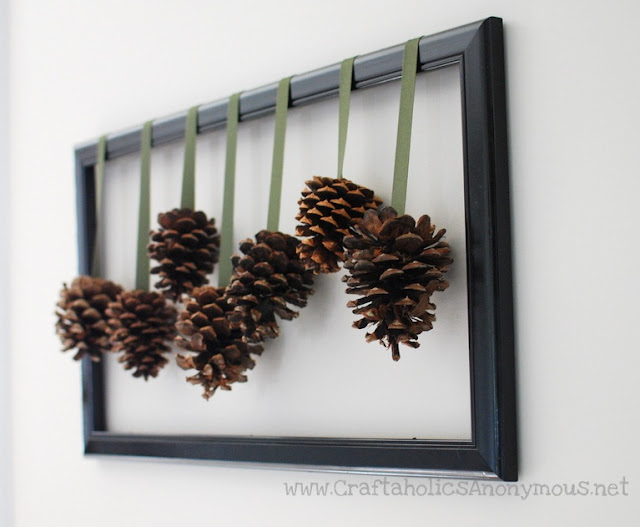
This post is a sort of "mix and match" one. If you read Snow globes with a twist, you might remember that I spent the last few days of summer collecting pinecones in Wimbledon Common. And early in September I wrote a post about how to make wall Art with buttons. If you merge these two ideas, this is what you'll get.

Wall art with pinecones tutorial
Photo Credit: Craftaholics Anonymous

As you can see from the picture above, the premise is simple, but if you feel the need to follow a tutorial, Craftaholics Anonymous is there to help you! They will guide you through how to glue the ribbons to the pinecones and how to stick them to the back of the frame. 

Adding my two cents: I would try to, rather than folding the ribbons over the top border, to have them going under it, but still hiding the tips on the back of the frame. It might not look as original, but I'd like to see the effect. Also, I love this particular tone of green, but I can't help but associate pinecones to the holidays, so if you want a more Christmassy effect, you might try a dark red instead.  

Tuesday 23 October 2012

Make your own buttons

I came across this tutorial ages ago, but I was debating with myself if I should buy the shrinking plastic or not to give it a go myself... Well, I did buy, I did try to make a few and I absolutely love it!

Although you need a fairly steady hand and it helps if you know how to draw well - neither qualities I consider myself to have - still it is so much worth to make your own buttons! You can always "cheat" and print off sample layouts online... I am planning on making owl buttons for my Christmas outfit (did I mention that this year's theme will be owls?)

Make your own buttons tutorial
Photo Credit: Scissorspaperwork.com

This tutorial is by Scissorspaperwork.com and, guess what, there is a freebie printable template for you to download! The secret to success is to use really fine point pens. I found the ones recommended by Kimanh - Zig Millenium - very good indeed, their line is 0.45mm and they're waterproof, fade-proof and non-bleeding.

It scared me a bit how fast the buttons shrunk! This was my first attempt ever with shrinking plastic and I used the oven, not the heat gun. I also, just to be on the safe side, placed my buttons over a greaseproof paper. When I make my owl buttons I will update this post =).  

>> Click here for the tutorial.

Monday 22 October 2012

From blogger to blogger - Planner Printables

Today's post is a gift to all bloggers by the lovely Kelly, a mother of 5 that runs one of my favourite family blogs, The Complete Guide to Imperfect Home Making. It's a blog planner!

Blogger planner printables and how to fill them using Skim!
PDF credit Imperfect Home Making + Skim

The more I think about it, the more it makes sense. I pretty much write a list for everything in my life, so why not have one for M&P? Until today I tended to navigate through an infinite number of bookmarks, post-its and a folder on my desktop called "inspiration", but I am sure this will make it all a lot easier. 

And do you know what is the best part for me? I don't know about you, but when it comes to blogging, I need to keep track of links and sometimes even copy to my email drafts a piece of css code I'd like to try out... If you download Skim PDF Note Taker (for mac / freeware) you can do it! 

It's so easy to use and will save quite a few trees - I always try to remember not to print anything if it is not strictly necessary. Consciously blogging and saving the planet!

Don't forget to visit The Complete Guide to Imperfect Home Making. Kelly has a few more must have free printables, including grocery shop list, dinner and weekly planners.

Sunday 21 October 2012

"An elephant never forgets" card tutorial

You probably know by now - particularly if you follow M&P on twitter - that I am owl addicted. My granny loved owls and I guess since she passed, I sort of inherited the liking for these feathery animals. If you're asking yourself "why is she talking about owls if the title says elephant?", well, today I had planned a tutorial on how to make cute little fluffy owls out of baby socks, like these ones here, but when I came across this little guy below I couldn't help it...

An elephant never forgets card tutorial
Photo Credit: Rook No. 17

This lovely card is simple to make if you download the template, available at Rook No. 17. The tutorial is straight forward and what I like most about it is that it uses only materials we tend to have lying around at home. It's also another idea for those old yellowy books we used in previous posts (check the category Old Books or have a look at the new section, Smoothie, for a series of posts featuring "good old books").

Saturday 20 October 2012

Work in progress

Hello! Following the feedback on twitter, today I am working on organising the labels here so that you can easily browse through the previous posts. I am sorry for not posting anything new, but I promise it will pay off. :)

Friday 19 October 2012

Wedding menu - printing on fabric

When Mr. Hunter and I were engaged and planning our big day, we decided that:

- First, we wanted it to be a very small, intimate ceremony;
- Second, the venue should have a lot of character but also be really simple, a blank canvas for us to add little details and make it as cozy and homy as we could; And...
- Third, every single detail would be handmade - and, because we were on a tight budget, this meant pretty much "handmade by us".

That's when it all started... A wedding is such an amazing opportunity to put into practice all the amazing projects we come across online. If only I knew then as many amazing blogs as I know today... But then it would have taken me twice as much time...Well, this all was to introduce the next tutorial, written by Mika78, a guest blogger on 100 Layer Cake.

Make your wedding menu printing it onto a beautiful fabric!
Photo Credit: 100 Layer Cake

The tutorial for this fabric menus is so detailed that, despite requiring quite a bit of time an attention, after a couple of tries you will find it really easy and should be able to keep doing it with your eyes closed (well, not literally, but you know what I mean).

The only specific materials you will need are: your chosen pattern fabric, some simple cotton canvas fabric, the iron-on transfer sheets and fabric spray glue. 100 Layer Cake also offers this menu template for you to download as a free printable! I just find the whole idea wonderful... What about you?

Thursday 18 October 2012

Printing on old books - Butterflies freebie

I don't know if you remember my tutorial about printing photos on old books, but this was definitely one of the best techniques I learned this year. I mean, the possibilities are infinite. If you go through the books label you will see that since, I sort of got addicted to finding different re-purposing ideas for old, yellowy books. So I was really happy when I found these butterflies to download at Poppytalk.

Printing on old books - Butterflies freebie
Photo Credit: Poppytalk

Denise Sharp, of Studio d.Sharp, wrote a lovely guest post tutorial teaching us how to do a birthday card badge. It's not that I didn't like the card, it's gorgeous! But I simply love these butterflies and can think of so many other uses for them! Right now I am dying to make an arrangement and placing it in a picture frame. I should be able to work on it over the weekend and then I will update this post!

>> Click here to download the butterflies pattern (pdf)

If you can think of any other uses for them, please let me know @craftyblog! =)

Wednesday 17 October 2012

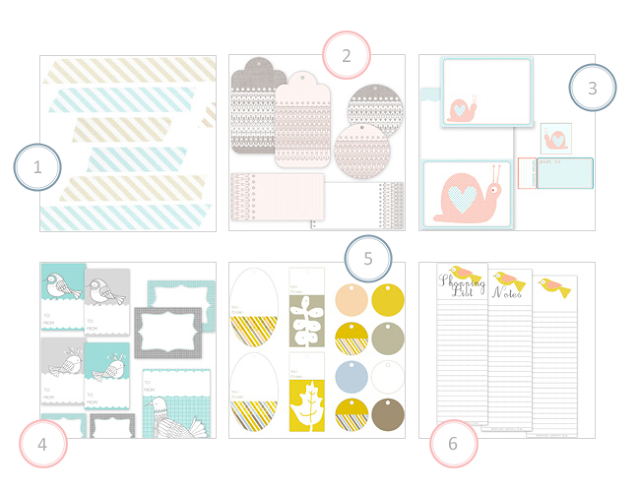
A good selection of free printables

Today's post is quick and easy. I thought you would like these printables from Creature Comforts as much as I do. I selected my top 6, however, there are a lot more available. I've already used a few of them. Most recently I adapted the bird tags #4 to make vouchers for Mr. Hunter on his birthday last month :)

My top 6 of free printables by Creature Comforts
All printables by Creature Comforts

1. Mint and mocha washi tape. I use washi tape all the time when I am scrapbooking and if you've been here before, you saw that quite a few posts have digital versions of them... I just can't help it!

2. Lace patterned label & tags. These colours are lovely. They look great when printed on card. Sort of a must have for the holiday season.

3. Snail stationary - Do I need to say anything about this one? Or isn't this the most adorable snail you've ever seen?

4. Winter bird gift tags - I love these birds! Did you notice that the bottom one (not the pigeon) has a pair of antlers on its head? I can't help but think that the reindeers weren't on a strike over Christmas. Anyway, for the vouchers I did in September I got rid of them... You can see it here!

5. Fall inspired tags - Ok, so you might be thinking now that I chose too many tags. But what I really like about his one is the pattern! When you like playing around with Photoshop as much as I do, you can find 100 different uses for them!

6. Bird shopping list - This is actually a tutorial for fridge magnets made of repurposed tins, but Ez made this lovely lists available for download on the same post. They look great on the fridge!

Tuesday 16 October 2012

Magic decal deserves magic designs...

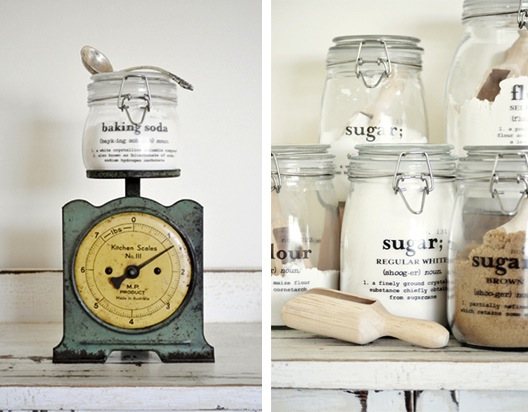
And Kristine - from Australian blog The Painted Hive - found a gorgeous way to embellish plain jars with dictionary inspired labels to use them as canisters!

Magic decal tutorial with free printables
Photo Credit: The Painted Hive

This is not a beginners tutorial. I confess it's the sort of thing I'd probably put off for a while, as it requires a lot of very specific materials I do not have just lying around with my craft kit, like decal paper (blue watermark on back), magic paper (attached translucent protective paper) and a laminator.

However, Kristine was so kind to share a pdf and psd files with her label design, as well as carefully writing this tutorial, that I couldn't resist. I had to share it here. 

>> Click here for the tutorial
>> Click here to download the pdf and/or psd files

Magic decal tutorial with free printables
Photo Credit: The Painted Hive

And just for the record, The Painted Hive is on my top ten list of best blog layouts ever! Don't forget to visit the free printable section!

Monday 15 October 2012

After candles and fairy lights... Luminaries!

First of all I'd like to apologise if you visited M&P in the past two days and had troubles visualising any of the posts... As you can see, we have a new look, but it came at a price - as I am not an IT expert, it took me some time to fix a few bugs... All working now, so let's move on!

Today's post is not only a great DIY tip by wedding planner and "prettiness obsessed" Rhi, but also my way of rectifying a mistake.

Luminaires are given a unique touch, using only - believe it or not - tissue paper!
Photo Credit: HeyGorg.com, photos by Beth Kaye.


I found the tutorial I featured on the previous post, Fairy lights make a fairy tale room, in a blog that forget to mention they didn't own the credit for it. As I had no idea at the time, I ended up crediting this (now added to my black list) website...

Today, however, browsing for similar projects, I came across HeyGorg.com, Rhi's website. And, to my surprise, she is also the hands and mind behind the paper cup garland... Well, having said that, I couldn't help but feature another of her simple and wonderful creations.

After candles and fairy lights, it's time for luminaires to be given a unique touch, using - believe it or not - tissue paper. For the full tutorial (with text) visit HeyGorg.com.

Luminaires are given a unique touch, using only - believe it or not - tissue paper!
Photo Credit: HeyGorg.com, photos by Beth Kaye.

NEW: Follow my blog with Bloglovin

Sunday 14 October 2012

Fairy lights make a fairytale room

This one has been around Pinterest so you might have seen it before... I was just going through my bookmarks and remembered I hadn't posted it here yet. I just love it! And with the holidays approaching, this is a lovely way to make the old Christmas lights a little more charming.

Fairy lights make a fairy tale room
Photo Credit: HeyGorg.com, photos by Beth Kaye.

The tutorial is self-explanatory, but just to run it through: you will need paper cups, beautiful pieces of scrap paper. double sided tape, scissors, a pen knife and, of course, fairy lights (preferably white ones).

Fairy lights make a fairy tale room
Photo Credit: HeyGorg.com, photos by Beth Kaye.


Saturday 13 October 2012

Shine a light on me...

This is that time of the year when the light starts to fade, the sun sets earlier than you would like it to and we tend to keep the windows closed for most of the day to keep the heat in. I don't know about you, but I love to light candles. I know they don't replace the warmth or the brightness of sunshine, but they have their charm... Of course, we can always add a little bit more to it.

Below is a selection of my favourite DIY candle light make overs I found online. I hope you like it!

A selection of my favourite candle DIY projects.
A selection of my favourite candle DIY projects. See list below for pictures credits.

1. Place candles in nice vases surrounded by a selection of different nuts. They make a great holiday theme centre piece. Photo by Shelterness.com.

2. If you love the smell of coffee beans as much as I do, this idea is marvellous! Tea lights in a bowl filled with coffee beans are a charm for every table and give the best aroma you can ask for. Photo by Leschosesdemarie (or, at least, this is where I found it).

3. This might be a bit over the top for your house if you live in a modest size place like me... However, if you're planning a garden party or even as a wedding decoration idea (rice means happiness, doesn't it?), why not to fill extra large jars with white rice grains and this big thick candles? I believe sand would look great as well! Photo by InTheFunlane.com.

4. Number four is a classic, but still one of my favourites. Just the other day I was collecting twigs at Wimbledon Common to make it. Long tall glasses or vases filled up with water, twigs and floating candles. Beautiful effect. Did you know if you take the metallic wrapping off a regular tea light they float? I tried it just the other day. As the wax melts, it spreads a bit and might stick to the side of your vase, but apart from that, it worked fine. Photo by The Family Ceo.

5. Another version using coffee beans, just to show that no matter if in a glass or in a bowl, with small or big candles, you still won't find a nicer aroma to fill your room in a cold day... Photo by TheBridesCafe.

6. If you'd rather use a large shallow bowl, why not add flower petals and aromatic oils to different shades of floating candles? Floating Candles Designs has not only this but a bunch of other ideas of decoration using, of course, floating candles. It also teaches you how to make them too!

7. Last but not least, another autumn inspired idea. With mod podge, stick dry pressed leaves around a clear jar, coat it again with another layer of mod podge and place a small candle inside. The colours will be lovely... Tutorial and picture by Ginger Bread Snow Flakes.

If you have another idea, share it with me on M&P Facebook page or via twitter @craftyblog.

Friday 12 October 2012

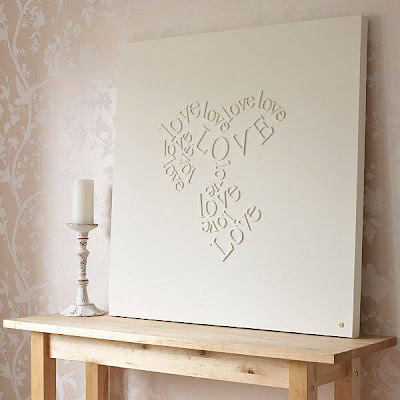
Make your own falling in LOVE canvas

I need to thank today's post to Laura, from {Inspiration for Moms}. Her lovely post has the heart & soul of every crafter. You see something you love somewhere, you realise how much it costs, step back and tell yourself: "Come on, I can make that if I want to".

Make your own falling in LOVE canvas
Photo Credit: Gorgeous Graffiti


These canvases above and below are from Gorgeous Graffiti and are for sale on NotOnTheHighStreet.com for £100 and £300 respectively. If you have money to spare, go ahead and buy them. However, if you can think of a better use for your paycheque but still would love to have one of this on your wall, why not to give it a go and make one yourself?

Make your own falling in LOVE canvas
Photo Credit: Gorgeous Graffiti

You can buy a plain canvas, the size of your preference, for as little as £3 (25cm x 25cm). And you can get from pretty much any stationary shop that sells children items a bunch of wooden letters. You can get an entire alphabet for £2.60 (the plain ones) or you can spend a bit more and get some nice flourished fonts.

Glue them on your canvas than spray paint over it. Voilà, you have achieved the same result for much less and you can even adjust it to your needs. Write words that mean more to you than the pre-made ones, like Laura did here.

A suggestion: Why don't you write the names of everyone in your family with different size fonts? These would make lovely wedding gifts as well and you could make them unique. 

Thursday 11 October 2012

Preserve the beautiful autumn leaves

I love autumn (fall, if you prefer...). There is something about the weather, the colours and the freshness of the air that fascinates me. In Brazil you can hardly tell the difference between the seasons, but in the UK you can. I love seeing the piles of golden colour leaves covering the grass in the park and the trees with lots of different shades of orange, yellow and red.

Preserve the beautiful autumn leaves using beeswax
Photos by MarthaStewart.com

This technique posted in MarthaStewart.com shows us how to preserve leaves simply by dipping them in beeswax. Martha uses bleached beeswax, the fairly white one (in Amazon - The Wax Factory - you can buy 2x 1oz bars for £1.65).

Melt the wax in a double boiler or use the same process we did for melting chocolate on Dark Chocolate and Coconut Bonbons post, which is resting a bowl on top of a sauce pan with hot water. Be careful not to let the wax boil by any chance.

Holding by the stem, dip the leaves one at a time. Be careful not to make the coat too thick (remember that, should you wish, you can always repeat the process to achieve a different look). Hang them by the stem again until they're fully dry. For more details, visit the original post.


>> Have you joined M&P mailing list? Every Friday you will receive a summary of the week, so this way you don't miss anything! And don't forget, you can also follow M&P on Twitter & Facebook.

Wednesday 10 October 2012

Free printables: Sweet messages for your bathroom!

Of all the rooms at home, I think that our bathroom is the one that could do with a little be more personal touch, so I started to look online for ideas. Although they are targeted at children, I couldn't help but find the J & A and Co. printables lovely and had to share them here.

Free printables: Sweet messages to make your bathroom more welcoming
Photo Credit: J & A and Co.

Andrea made available two lots os free printables you can download and hang on your walls. They are lovely and together with a set of nice little frames will make your bathroom a lot cosier and welcoming, particularly to your children =) 


>> Have you joined M&P mailing list? Every Friday you will receive a summary of the week, so this way you don't miss anything! And don't forget, you can also follow M&P on Twitter & Facebook.

Free printables: Sweet messages to make your bathroom more welcoming
Small samples of some of the printables available to download

Tuesday 9 October 2012

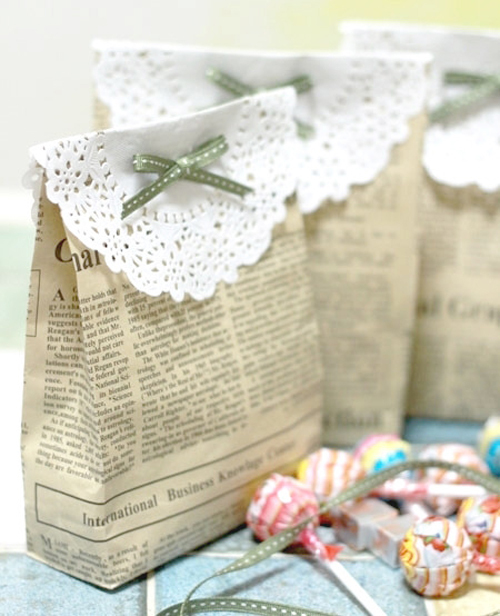
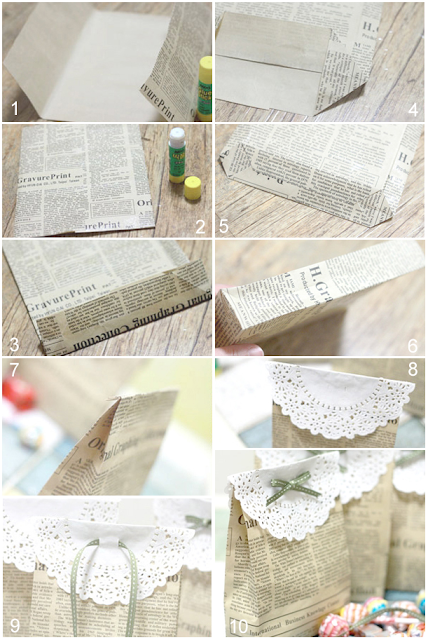
Sweet (news)paper bags

Ah, the web... The more I think about life before the internet, the more I wonder... What did we used to do? What are the chances I would have come across this amazing Vietnamese tutorial? And even, how would I have been able to read/translate Vietnamese in order to write this post?

Sweet (news)paper bags
Photo Credit: kenh14.vn


Anyhoo, I am glad I found this. I know it came from this link, and in a wild guess, I'd say this is a TV channel website?! But I am really not sure. I am glad the images say it all.

Sweet (news)paper bags. You could make them out of brown paper too, great to hold baby or wedding shower favours
I love the fact this is very self-explanatory, but let me know if you need a hand

In Brazil, on the 27th September, we celebrate a Christian holiday that is somehow our "halloween". Kids hit the streets asking for sweets and toys and it is tradition to give them little bags filled up with all sorts of candies. I can't help but think these would be perfect for it. 

But they are great for birthday party favours as well. And, of course, you can use the same tutorial to make them out of brown paper, instead of newspaper, and they would be amazing for baby or wedding showers. In the UK, you can get a bag with 20 rounded doilies in 4 different sizes for only £1.   

Monday 8 October 2012

Re-inventing an idea: buntings and bookmarks

I was reading an article in the October issue of Red magazine about re-inventing yourself when I came up with the idea for this post. A while ago I had saved two pictures I came across on Google images when searching for inspiration, but I haven't had an opportunity to post them here before. Now, however...

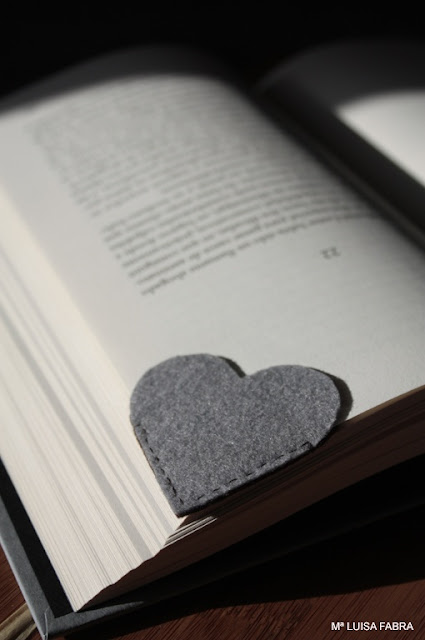
The 2 most read posts on M&P until now are about bookmarks: Buttons + Paperclips = Bookmarks! and Cute monster bookmark. Well, here is another way of re-inventing bookmarks.

Another way of re-inventing bookmarks
If you know the link to credit this photo, please let me know

I can't think of anything easier to make. Just cut two heart shaped pieces of felt and stitch them together. So easy and quick to do, you can make loads and give them away as little gifts to colleagues and classmates. If you want to play around with it, why not add two medium size buttons and a small one making eyes and nose? Although this might sound like a bit too much, you'll only know if you try...

I wouldn't say the second idea is easier, but it is as simple as this one. Remember the Heart shaped confetti post? If you got a heart shaped hole punch like the two I suggested then, this next idea will be easy peasy.

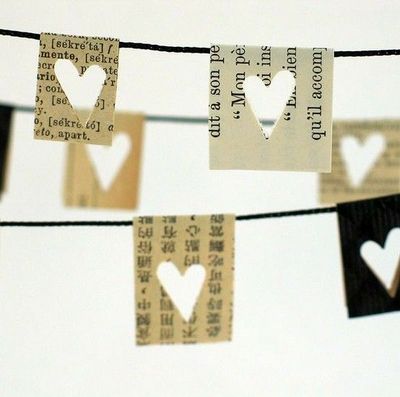
Lovely vintage looking bunting made out of old books with a heart shaped hole punch
I found this on Google images whilst looking for Photoshop bunting brushes 

If you hit the charity shop and got some old looking books for the Heart shaped confetti or the Printing on old books posts, I am sure you might still have a few pages to spare making this mini bunting. 

Just cut small rectangles, fold them, make the heart shapes with your hole punch then use some threat, yarn or twine and fold your bunting through it, remembering to stick the bottom with mod podge or craft PVA glue. If you rather have a colourful finish, not a vintage one, use any piece of scrap-paper you have lying around.

I hope you liked this post. I love when I can think or come across a new use for materials or tools I acquired for a different project. I guess it's all about re-inventing, isn't it?
If you know a creative way to use old books or different shaped hole punches let me know @craftyblog.

Sunday 7 October 2012

Extra Petit: Polka dot bow blouse

I realised that among all the DIY ideas I posted so far, only a couple are about outfits and they actually concentrate on accessories! I couldn't believe. So I thought that to make up for it I should find a really good tutorial to share here. Well, I couldn't think of a better tutorial than one from Extra Petit - one of the best, if not the top #1 on my list, of DIY fashion must follows.

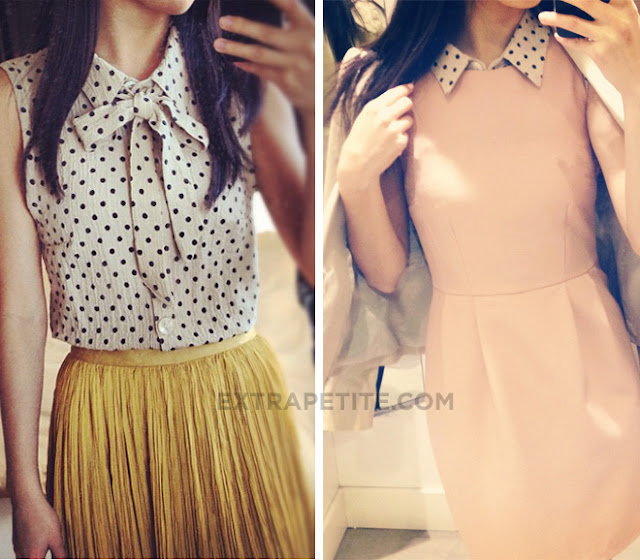
It all starts with a dowdy $2.99 shirt and it will turn into an lovely fashionable piece for your wardrobe!
Photo Credit: ExtraPetite.com

I wish - I just wish... - I was also a petite size. However, this blouse should look great on pretty much every woman. And following this visual, step-by-step "how to", you cannot get it wrong. It all starts with a dowdy $2.99 shirt and it will turn into an lovely fashionable piece for your wardrobe! You don't believe it? Check the Before vs After below.


It all starts with a dowdy $2.99 shirt and it will turn into an lovely fashionable piece for your wardrobe!
Photo Credit: ExtraPetite.com

Saturday 6 October 2012

Snow globes with a twist

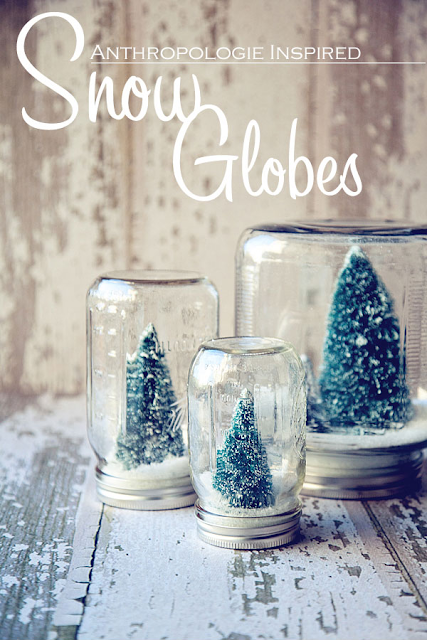
As promised, another post building up for Christmas (by the way, my favourite holiday since I was a kid). This one is by the lovely Heather, from Whipperberry.com (click here for her tutorial). These snow globes are great and you can easily make them with the kids for absolutely nothing. It just needs a bit of a twist...

DIY snow globes
Photo Credit: Whipperberry.com

I decided to adapt the original tutorial and made my own re-using an empty sauce jar, covering the lid with some brown scrap paper, gluing a pinecone I collected from Wimbledon Common not long ago (I actually have a bag full of them, I just couldn't help when I saw that many lying around) and using rock salt as "snow". The ribbon was just to add a final touch to it.

Snow globes with a twist
Photo Credit: Zaira with Pentax K-x

I'd love to see more versions of it, if you come up with any please share it with me =)

By the way, have you followed M&P on twitter already? We're @craftyblog

Friday 5 October 2012

Storage idea from embroidery hoop

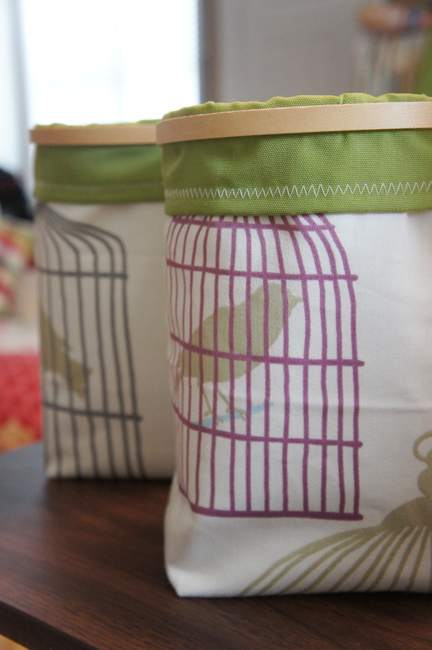
This has to be one of the cutest storage projects I ever came across! As Rachel explains on her blog Always a Project: "I don't think it is possible to have too many storage options. I'm always looking for new ways to stash my stuff". I couldn't agree more.

Storage idea from embroidery hoop
Photo Credit: Always a Project

For this project you will need, again, a sewing machine. I am still in the process of getting one (fingers crossed it will come soon). The material required is: 2 pieces of fabric 14'' x 22'' and a 6'' embroidery hoop. 

Of course you can change the measurements to adjust the bag to your needs, however, I wouldn't make it too big and try to avoid storing too much weight in it. 

Storage idea from embroidery hoop
Photo Credit: Always a Project

I am thinking ahead of time already, but I'd love to use these to organise little things on a baby's bedroom. They seem just too perfect and look very sweet. I wish I could reproduce them exactly, using the same fabric and all!

For this great tutorial and some other lovely projects, visit Always a Project, which by the way has one of the best blog descriptions I ever read! The dilemma of more inspiration than time... 

Thursday 4 October 2012

Zakka Owl Pennant

Zakka (from the Japanese 'zak-ka' 雑貨 or 'many things') is a fashion and design phenomenon that has spread around the world. The term refers to everything and anything that improves your home, life and appearance. Having said that... Aren't these lovely?

Zakka Owl Pennant tutorial
Photo Credit: Moonstitches

I wouldn't say this is the easiest of the tutorials. It requires some experience, sewing machine and some very specific material (not the sort of thing everyone has lying around at home). But if you're looking for a new thing to throw yourself into, why not give it a go?

Moonstitches has a step-by-step tutorial with pictures and a a full size pattern for you to download. I know I am crazy about owls and this year Christmas will be all about them, believe it or not! But these could be used also to decorate babies bedrooms, winter gardens, maybe an anniversary celebration... Be creative!

Zakka Owl Pennant tutorial
All photos by Moonstitches

Wednesday 3 October 2012

Wedding inspiration: ♡ notes

I know mine was over a year ago now, but I can't help but love wedding ideas! If I didn't find the whole process so stressful, I would seriously consider becoming a wedding planner! Well, this one comes from one of my favourite websites, Zomoc.com.

Lovely idea for a wedding favour: love notes!
Photo Credit: Zomoc.com

What I love most about this project it is the simplicity (not too mention that it will hardly affect your budget at all). You can re-use pretty much any jar you come across and decorate a whole table of them to give away. Twine and nice paper will do the rest. I love the idea of the board at the end. You can use it to hang your own messages for your guests.

Lovely idea for a wedding favour: love notes!
Photo Credit: Zomoc.com

I live opposite Wimbledon Common, so to get hold of twigs is easy peasy. You can use twine to hold a bunch together making the sides and with little nails and more twine attach them together. Use the mini pegs to hold your messages. I particularly would handwrite them and make each one personal, but if you want to go with the old typewriter font effect, you can find a few here.

For the love tags, you can either make your own on Photoshop and print on card or you could use vintage looking heart shaped doilies. Here are some pretty cute ones I found on Ebay, but I'm sure you can get smaller or bigger sizes to fit your needs.