


 |
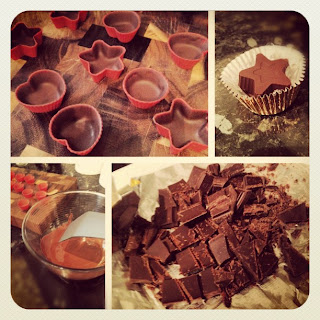
| Taken with Instagram |
 |
| Taken with Instagram |
You will need
Ingredients:
400g chocolate bar
I made them with dark chocolate, but you can use milk or white chocolate as well
A can of condensed milk
150g of desiccated coconut granules
Butter or olive spread
Kitchenware:
Silicon chocolate moulds (about 40)
I got mine from Amazon for £3.99 a pack with 24
1 x large and 1 x small pan
A glass bowl
A couple of trays to go in the fridge
A wooden spoon, a normal spoon, a tea spoon and a knife
toothpicks
Preparing time:
Because tempering chocolate is a slow process and requires a lot of patience, I would say 3-4 hours to make about 40 bonbons.
How to:
I like to start preparing my work surface as well as my ingredients. I had 40 moulds so I decided to make batches of 10 at a time.
1) Prepare the coconut filling. This is what we call "beijinho" in Brazil, you can read more about it here ("Little Coconut Kiss"). In a small pan add the condensed milk, a spoon of butter or spread and about 150g of coconut. Use a wooden spoon to stir it on a low to medium hob. You can add more or less coconut depending on how dense you would like the filling to be. When it stops sticking to the sides of the pan you should take it out and reserve on a buttered plate.
Note: You can use different fillings, if you don't like coconut, for example, Nutella works really well!
2) Separate half of your chocolate and cut it into small pieces. By small I mean, break the chocolate in the usual squares and cut these into half with the help of a knife. It's good to do it over the actual chocolate wrapping so not to waste any bits. Now we need to melt and temper the chocolate.
3) Fill a large pan with water and place a glass bowl on the top of it. Make sure the bowl is large enough that it won't "sink" in the pan. Also be careful not to over fill the pan with water. Test it before placing both on the hob. Place half of your cut chocolate into the bowl. The hot water underneath will make the chocolate melt in 10 to 15 minutes. While the chocolate is melting, prepare your mould. Place them on a tray and leave it next to you. Separate a tea spoon and the toothpicks.
4) Once the chocolate in the bowl has fully melted, turn off the hob. Carefully, so not to burn yourself with the vapour, remove the glass bowl from the top of the pan.
Note: Remember, chocolate and water don't go together, so make sure not to spill any.
5) Tempering the chocolate is mainly to get it down to the right temperature for it to be worked. This is important otherwise your bonbons might never solidify as they should or might become all sweaty. If you have a kitchen thermometer, you can use it to check the temperature. Dark chocolate is good to be used when it reaches 30ºC to 32ºC. Milk and white chocolate, when they reach 29ºC or 30ºC. To bring the temperature of your melted chocolate down, use the remaining chocolate you cut into pieces before. Add it to the bowl, one full spoon at a time and stir it. The newly added chocolate will start to melt and this will bring the temperature of the whole thing down slowly. If you don't have a thermometer, a good way to check if you reached the right temperature is to stick a wooden toothpick in the chocolate and to bring it to your bottom lip. If the chocolate feels colder than your lip, it should be ready.
6) With your chocolate tempered, use a teaspoon to help covering your first 10 moulds with a thin layer of chocolate. Make sure to cover it as evenly as you can but not to make the layer too thick. Place your first tray in the fridge for 10-15 minutes while you are doing the same thing with your second batch. Your first batch should be ready when it looks fully dried (slightly lighter colour, pretty much how it looked like before you melted it). Repeat the last step twice on each batch until you have covered every mould with three layers.
7) Once the third layer has finally dried, your coconut filling should be cool enough for you to use. So again, using a tea spoon to help you, add the filling remembering not to leave any lumps.
8) With the filling in place, it's time now to finish off by "closing" your bonbons. Use the tea spoon to seal the bonbons with another layer of chocolate. Don't worry about making it too thin now, the important thing is not to leave any gaps, so the bonbon doesn't break when you take it out of the mould. It's ok if your base goes a millimetre or two over your mould height. Once you're done, place your trays in the fridge again and you should be ready to get them out of the moulds in about 20 minutes time.
9) Now use the same bowl and repeat the process from step 3, using the other 200g of chocolate. The reason why I didn't tell you to use it all in one go is that it would make it harder for you to temper it and to keep your melted chocolate to the right temperature for it to be worked throughout the whole process.
I hope you like it!
sometimes you will need high power vacuum cleaners to just suck those dirt and dust that have accumulated over the years,. pg
ReplyDeleteGreat post thannkyou
ReplyDelete