Monday 30 January 2012

Cute vintage doily envelope

With Valentines Day on the way, I thought of sharing with you this easy DIY cute idea.

I saw these vintage envelopes made from cake doilies last year in a wedding magazine and I used them to send my "save the date" cards. As I could not find the magazine or the original tutorial, I decided to create one of my own.

Cute vintage doily envelope
Photo Credit: Zaira Brilhante, with Pentax K-x


Materials:
- The card you want to send inside the envelope!
- Rectangular paper doilies, the one I used is 25cm x 35cm and I got mine from here
- Pencil
- Scissors
- Glue (or Mod Podge with a little brush, to help you applying)


1. With the doily facing down, place your card on top of it as per fig. 1.

2. Fold both sides (left & right) and also the top, to make sure your envelope will close properly. Note: Keep your card in place, as it will help you when folding. Make sure you leave a bit of room on both sides, as you don't want it to be too tight.

3. With a pencil, trace a line in the bottom, about 1.5cm below the end of your card. With the doily still folded, remove the card and cut over the line.

4. Use the glue or Mod Podge to stick the bottom. Be careful not to use too much glue, as doilies can be quite fragile. Wait until it is fully dried and voilĂ , you have a cute vintage envelope!

Friday 27 January 2012

Our wedding guest book

The book below was used by Olly and I as a guest book at our wedding, but if you love scrap-booking you can use it for pretty much anything you wish to...

Wedding guest book
Photo by Zaira Brilhante
After not finding any scrapbook with a cover we liked, I decided to decorate one myself. I bought a plain black scrapbook from Paperchase (mainly because it was the nearest shop to my old house) and a used lots of different ribbons, strings, twine that I happen to have as I had to stock up on this kind of things before the wedding.

The trick to achieve this look is to use ribbons with different thickness and texture but to stick to a colour theme. 

Materials:
- Plain scrapbook
- Different selection of ribbons, strings and twine
- Something to stick them to the book: you can choose from glue, Mod Podge (my best friend!) and double sided sticky tape (it does the job as well)

How to:
Making it is pretty straight forward. The only tips are:
1.  Make sure you cut your ribbons and twine at least 4cm taller than the height of your book, so that you can fold and glue them to the back of your cover both on the top and bottom.
2. Use the glue or the Mod Podge to stick the ribbons on your cover, but don't apply it to twine or string, unless it is on the tips, on the back of the cover. Note that on the back you can also use double sided sticky tape, it works really well.
3. Leave some space (from 1/4cm to 1/2cm) between each ribbon, it makes it look more natural.
4. To finish off, use the first page of your book and stick it to the back of the cover, this way hiding the tips that you glued to it.

Wedding guest book
Once you glue the first page to the back of your cover, you have a perfect finish!
Wedding guest book
Both photos by Zaira Brilhante

Thursday 26 January 2012

Cute monster bookmark

As I said before, I love arts & crafts, despite not having the skills. So I often search the web for cute little useful DIY solutions that are easy to make. One of the latest ones I came across on http://nheilke.com/ was a 
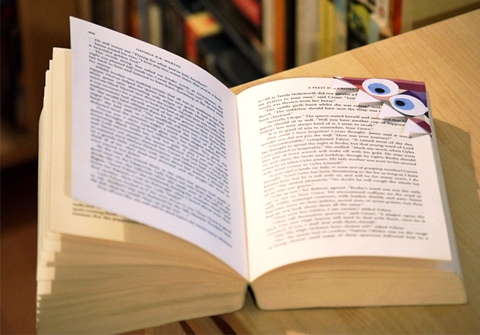
corner bookmark. Well, if like me you still have a bookshelf full of paper books (if you haven't surrendered to Kindle yet), one of these might come quite handy.

Cute monster bookmark
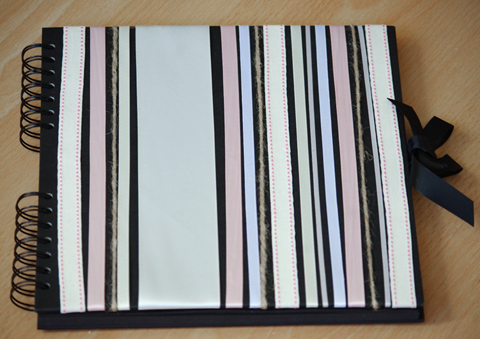
Photo Credit: http://nheilke.com
My main reasons for loving them are:

Unlike some other bookmarks, they don't stick out, getting all shabby and creased.
They don't add any relevant weight to your book
Because of their format, they are very reliable and won't come off easily (at least not as easy as magnetic ones do)
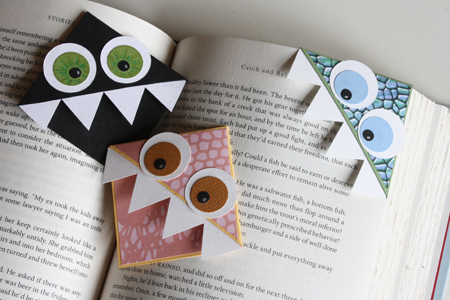
They are pretty cute and I love their faces as if they were devouring the book!

Well, so here I give you two options: you can keep reading this post and I will explain a quick way of making them or... You can follow the link I mentioned above and read the original (and very very long) tutorial. Feel free to choose.

Materials:
- Scrap paper
- Pencil
- Scissors
- Glue (I actually prefer Mod Podge, matte finish, and I apply it with a brush)
- And the template designed by Natalia Heike that you can get by clicking here (pdf)

How to:
1. So, the first step, in my opinion, is to print the template and to cut the body part. With that in hand, place it on your piece of scrap paper and trace the contour to help you cut it as in the model.

2. With your body cut, trace two lines separating the main square from the two triangles (exactly like it is on the model). That will be a good guideline for you when folding. If your scrap paper is double sided, with cute patterns on both sides, then it doesn't really matter what way you will fold what I call the "wings". If not, keep the side with the pattern up and fold the two wings inwards on the lines.

3. This step is only for those whose scrap paper is not double sided. Now, with that squared shape figure in your hands, use another piece of scrap paper to cut one square the same size as the one you already have (that later will go on the back of your marker). Cut also one triangle, the same size of one of the wings (that will go over the folded area), making the face of your little monster. Use the glue or the Mod Podge to stick first the triangle and after the square.

4. Now it is time to cut the teeth and the eyes. For the teeth, I printed the template from the link (see materials above) on a plain white paper and I stuck it to the main part by passing a tiny amount of Mod Podge parallel to the top edge and placing it under the folded part. Remember, when using the model, keep the side with the reference lines facing down, so you don't see them once you glue it.

5. For the eyes, I didn't find the template useful. I'll explain: I didn't have scrap paper in the colours I wanted and I am terrible cutting circles. So the solution was to quick fix something on Photoshop. For my one, as you can see in the picture, I actually printed 3 pairs of circles (black, blue and white) and glued them together before placing the eyes on my marker. However, I thought of trying to make your life a bit easier, so you can click here and download an "eye model". Just import the image file on Word for example, re-size it (and even change the colour if you want) then print. Once you cut and glue it to the body, your monster is finished!

Well, that's pretty much it, make sure your little monster is fully dried before you use it. Aren't they the cutest corner bookmarks?

Cute monster bookmark
Photo by Zaira Brilhante
Cute monster bookmark
Photo by Zaira Brilhante

Thursday 19 January 2012

Beijinho de Coco (little coconut kiss)

Yes, I have a sweet tooth. I can't help it. One of my favourite sweets is "beijinho", a Brazilian treat very common in kids parties. There are - I believe - about a hundred different ways of preparing it. As cooking is not one of my strengths, I obviously like to prepare the easiest one. Why not? It still tastes delicious!

Beijinho de Coco (little coconut kiss) recipe
Photo Credit: http://chaddiachocolate.blogspot.co.uk

You will need: 
A can of condensed milk
Present in pretty much every Brazilian recipe! 
About 250g of desiccated coconut granules
One spoon of spread or butter
Granulated sugar and cloves to decorate

You can also use more dessicated coconut to finish it (as in the picture), but if you're not on a diet, I suggest to stick to the sugar, it adds another texture to it.

How to:
Mix the condensed milk, the butter or spread and the 250g of coconut and cook it on a low to medium hob. Keep stirring, you will notice that the mix is thickening. When it is not sticking anymore to the sides and bottom of the pan, you can transfer it to a plate.
Wait until it is cool enough for you to make the little balls. Then, it is up to you, you can either roll them on the sugar or in more coconut and add the clove as a final touch, for that little bit more flavour and colour.

Preparing time: About 15 minutes

Make your own lids

When Olly and I were planning our wedding, we decided to get our hands dirty and to DIY as much as we could. I had lots of ideas, but very little skills that enabled me to make them come true, so I went searching the web and I found at www.designsponge.com a very handy tutorial that showed me how to make the lids for the jars you can see in the picture.

Make your own jar lids
Photo Credit: Zaira Brilhante

The hardest thing was to find where they sell the Mod Podge in the UK (I had never heard of it until that day). But then I found this very useful website www.kardsandkrafts.co.uk where I got not only the Mod Podge from, but also the cute patterns I used in the end.

What you will need:
Lids
Little squares of paper
Mod Podge (matte finish)
Pencil
Scissors
Brush

How to:
1. Wash jars and remove any labels. At Design Sponge they say for you to use Goo Gone, I used Sticky Stuff Remover by De.Solv.It, that I got from Amazon. To remove smells, soak in a bleach solution and let it dry.
2. Place the lid over your scrap paper and trace the contour with a pencil. Sketch a 1/2cm bigger circle around your first circle. You can use a compass or another round object to help you tracing it.
3. Cut strips about 1/2cm apart, that go right up to the first pencil tracing. Coat inside the smaller circle with Mod Podge and adhere it to the lid. Give it a couple of minutes to dry.

Make your own jar lids
Photo Credit: Grace Bonney
4. With the lid facing down, begin to glue the strips inwards and clockwise. Coat two or three strips at once and fold each one up and over the edge of the lid. It's ok if they don't fold making a perfect 90 degree and if some overlap, don't worry, it will still look great.
5. Once you've glued all the strips, turn the lid over (pattern facing up) and give it a final coat with Mod Podge to seal. In the original tutorial they say to coat the whole lid, but it didn't work for me, so I coated only the sides (the area of the strips that were folded), both inside and outside.

And here is how it looked like on the table at our wedding!

Make your own jar lids
Picture by our lovely photographer, Graham Morgan
For more pictures and the original tutorial, visit www.designsponge.com.